How to Install NVM on Ubuntu? (Step-by-Step Guide: Install NVM Ubuntu)
Node.js, a fundamental part of server-side JavaScript, requires flexibility in managing various versions. Developers need an efficient way to handle these versions, and that's where Node Version Manager (NVM) comes into play. Specifically designed for Ubuntu users, NVM is an advanced developer’s tool that simplifies this process. But, most beginners don’t know how to install NVM on Ubuntu.
In this guide, we will walk you through how to install NVM on Ubuntu. Furthermore, you will also discover how to update nvm version by executing a few easy commands.
Harness the power of NVM to streamline and enhance your Node.js development workflow. By following these step-by-step instructions, you'll become proficient in version control. In addition, you can install and switch between different Node.js versions easily.
What is NVM?
NVM (Node Version Manager) is an essential tool designed to manage different versions of Node.js on your device or machine. This tool is useful for developers who need to manage multiple versions of Node.js on their system. Node.js enables JavaScript code execution outside the browser, supporting server-side scripting and scalable, high-performance network applications.
Its event-driven architecture and non-blocking I/O model efficiently manage numerous concurrent connections, making it ideal for real-time applications like chat apps, gaming servers, streaming platforms, and APIs.
NVM is a powerful utility that streamlines the installation, switching, and management of various Node.js versions within a single environment. This open-source tool provides a command-line interface, making it easy for users to control and switch between Node.js versions according to the needs of their projects.
The primary function of NVM is to offer developers a hassle-free way to install, uninstall, and switch between various Node.js versions, eliminating the need for manual configuration. It simplifies the process of handling Node.js versions, providing greater flexibility in development workflows. By separating each Node.js version in its isolated environment, NVM ensures that dependencies and configurations are kept separate, resulting in a clean and efficient setup for each project.
In the below section, we will demonstrate how to install NVM on Ubuntu. Let’s get started!
Prerequisites
Before installing Node Version Manager (NVM) on Ubuntu, ensure your system meets the following requirements.
- Ubuntu 20.04 should be installed on your system, if it is not already installed you can install it inside the Virtualbox.
- Verify that the curl command-line package is available. If it's not installed, you can install it using the sudo apt install curl command. Or you can also use an alternate package wget to download packages online.
- Ensure you have administrative privileges or sudo access to execute the necessary commands for installation and setup.
Let’s start learning how to install NVM on Ubuntu using a couple of steps:
How to Install NVM on Ubuntu? (Install NVM Ubuntu)
You can install NVM on Ubuntu distribution using different ways. Here, we will demonstrate how to download and install NVM from the online Github source using the Curl command. So, perform the following steps to install NVM on Ubuntu 22.04:
Step 1: Update apt Repository
To start NVM Ubuntu installation, make sure all packages are up to date. However, you can update your system apt repository by executing the following command:
$ sudo apt update
Step 2: Download and Run NVM Installer (Ubuntu Install NVM)
In this step, you will see how to install NVM on Ubuntu. Once you update your all apt repositories, use the Curl command to download and run the NVM installer on your Ubuntu system:
$ curl -o- https://raw.githubusercontent.com/nvm-sh/nvm/v0.39.1/install.sh | bash
or
$ wget -qO- https://raw.githubusercontent.com/nvm-sh/nvm/v0.39.1/install.sh | bash
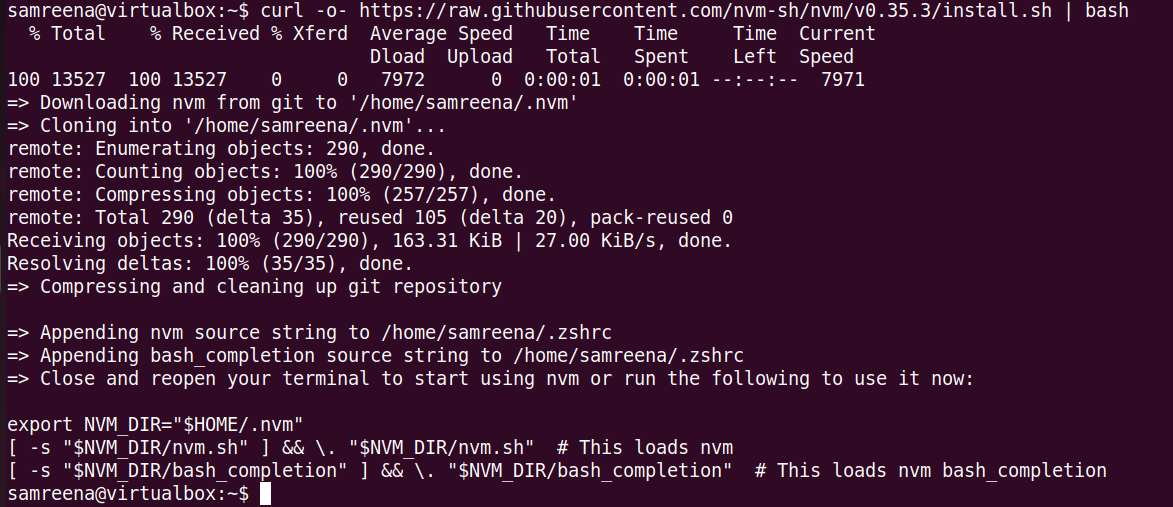
Depending on the commands available on your system, you can use either curl or bash. These commands will copy the NVM repository to a directory named ~/.nvm on your device.
Step 3: Change Profile Configuration
During installation, the NVM configuration should be automatically added to your profile file. For zsh users, this will be ~/.zshrc, and for bash users, it will be ~/.bash_profile or another profile file.
If the configuration is not added automatically, you can manually add it to your profile file:
$ export NVM_DIR="$([ -z "${XDG_CONFIG_HOME-}" ] && printf %s "${HOME}/.nvm" || printf %s "${XDG_CONFIG_HOME}/nvm")"
[ -s "$NVM_DIR/nvm.sh" ] && \. "$NVM_DIR/nvm.sh"
The above command loads NVM, making it ready for use. After updating your profile configuration, you will need to reload the shell configuration to apply the changes in your terminal:
$ source ~/.bashrc
Step 4: Check NVM Version
After executing the above commands, now nvm is ready for you to use. You can easily verify the NVM installation that nvm is installed correctly by running:
$ nvm -v
Congratulations! NVM installation is completed now. Above, we discover how to install NVM on Ubuntu. Now, below will see how to manage Node.js using NVM.
How to install Node using NVM? (NVM Install Node)
After installing NVM, you can install Node.js on Ubuntu using the NVM. To install Node.js using NVM, use the following commands:
Install Node.js Using NVM
To install Node.js using NVM, execute the following command inside your terminal:
nvm install node
The above command will install the latest Node.js version on your Ubuntu machine.
Check Node.js Version
Once the Node.js is installed on your system, verify the Node.js installation. You can check the installed Node.js using the below command:
$ node --version
The above command will display the installed Node.js version on your terminal window.
Installing the Current LTS Version
Using NVM, you can also install the latest Long-Term Support (LTS) version of Node.js on your system using this command:
$ nvm install --lts
Similarly, you can also install a specific version of Node.js using NVM. For example, if you want to install node version 19.9.0, in this case, use this command:
$ nvm install 19.9.0
If want to use a stable Node.js version on your system, you can install the stable version of Node.js, by simply run:
$ nvm install stable
Setting a default version is also possible with:
$ nvm alias default vX.Y.Z
The above command will help you to make a specific version your default.
Now that you've installed NVM on Ubuntu and successfully set up a specific version of Node.js, you can easily switch between different Node.js versions using the command nvm use <version_number>. This flexibility allows you to manage Node.js versions according to the specific needs of your projects.
List Installed Node.js Versions
To check which Node.js versions are installed on your system, you can easily list all the Node.js versions you have installed by running this command:
$ nvm ls
Switch Node.js Version
To Switch between installed Node.js versions. For example, to switch to version 18.20.3, use:
$ nvm use 18.20.3
How to Uninstall Node.js using NVM?
If you want to uninstall a particular Node.js version from your system, (e.g., version 18.20.311.5), use the:
$ nvm uninstall 18.20.3
How to Update NVM to the Latest Version?
To update NVM to the newest version, you can utilize the curl command similarly to the installation process:
$ curl -o- https://raw.githubusercontent.com/nvm-sh/nvm/$(curl -s https://api.github.com/repos/nvm-sh/nvm/releases/latest | grep 'tag_name' | cut -d\" -f4)/install.sh | bash
This command retrieves and executes the installation script from the latest GitHub release. This command is quite similar to the process of how to install NVM on Ubuntu. But, here you will update the already installed NVM package with a new one.
How to Uninstall NVM on Ubuntu?
To uninstall NVM from Ubuntu, you'll need to delete the NVM directory, usually found at ~/.nvm. You can achieve this by executing:/
$ rm -rf ~/.nvm
Furthermore, ensure to remove any NVM-related lines from your shell profile file (e.g., .bashrc, .bash_profile, or .zshrc) to fully eradicate NVM from your system.
Conclusion
In this guide, we demonstrated how to install NVM on Ubuntu. With NVM installed, you gain the ability to effortlessly manage, install, uninstall, and switch between various Node.js versions on your Windows, Linux, or Mac device.
Whether you're a beginner or an experienced coder, NVM offers a valuable solution for organizing your work and enhancing productivity. You learned how to install NVM on Ubuntu and update NVM to the latest NVM version.
This process is straightforward and brings numerous benefits, including easy switching between Node.js versions. This guide simplifies the process with clear terminal commands. Once installed, NVM enhances compatibility with various Node.js versions, providing greater flexibility and improving overall workflow. Its versatility extends beyond Ubuntu to other Linux systems and macOS, making it an essential tool for developers across different environments. NVM simplifies the management of multiple Node.js versions across various projects, ensuring seamless compatibility with each project's specific requirements.
If you are in search of a Linux VPS hosting Plan to host your website or solutions, you can experience the power of limitless hosting with 10GBVPS! Experience lightning-fast speeds to elevate your website performance to new heights. With our service, bid farewell to concerns about bandwidth limits or overage fees. Enjoy the freedom to select from a range of global locations, ensuring optimal speed and reliability for your website users.
Blog