How to install Java on Ubuntu
Java is a widely used programming language known for its versatility. It's used to build a broad range of applications, from mobile apps and desktop software to large-scale enterprise systems and web servers. If you’re planning to run or develop Java-based applications on an Ubuntu system, the first thing you need to do is install Java properly.
This guide provides a clear, step-by-step approach to installing Java on Ubuntu, helping you get your system ready for Java development or execution.
Prerequisites
To follow this guide, make sure you have:
- A user account with administrative (sudo) privileges and access to the command-line or terminal.
- A system running Ubuntu Linux
Overview of Java Versions and Platforms
Java is a powerful, high-level programming language used across multiple platforms. It is available in several editions to suit different development needs:
- Java SE (Standard Edition): The base platform offering core libraries and APIs for general-purpose programming.
- Jakarta EE: Built on Java SE, it adds tools for enterprise applications like web services and security.
- Java ME (Micro Edition): Designed for mobile, embedded, and IoT devices with limited resources.
- JavaFX: A toolkit for creating modern, rich user interfaces for desktop and embedded systems.
In this guide, we will install different packages and the Java SE edition on the Ubuntu system.
Java Installation Components
Java installations include two essential components:
- JDK (Java Development Kit): Provides tools needed for Java development, such as the compiler, debugger, and other utilities.
- JRE (Java Runtime Environment): Allows you to run Java applications, but doesn’t include development tools.
There are also two main Java distributions you can choose from:
- OpenJDK: An open-source version of Java that comes bundled with Ubuntu and includes community contributions.
- Oracle JDK: The official distribution maintained by Oracle. It includes the JRE and is available under a different license.
As of Java 11, both OpenJDK and Oracle JDK are functionally equivalent. Your choice depends mainly on licensing needs. OpenJDK offers the flexibility of installing the JRE separately, whereas Oracle JDK comes with the JRE included.
Installing Java on Ubuntu 24.04
You can install Java on Ubuntu using two different methods, listed below:
Method 01: Installing the Default OpenJDK from Ubuntu Repositories
Ubuntu offers OpenJDK 11 by default, which is sufficient for most development and runtime needs. Here's how to install it:
Step 1: Update Package List
Open your terminal and run:
$ sudo apt updateStep 2: Check if Java is Already Installed
To see if Java is installed on your system:
$ java -versionIf it's not installed, you’ll see a message suggesting installation options, such as:
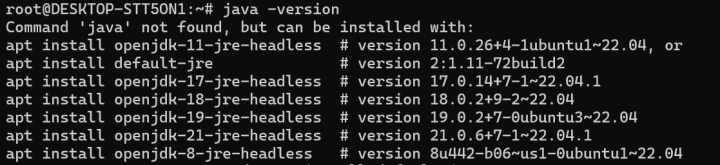
$ sudo apt install default-jre

$ sudo apt install openjdk-11-jre-headless
Step 3: Install the JRE
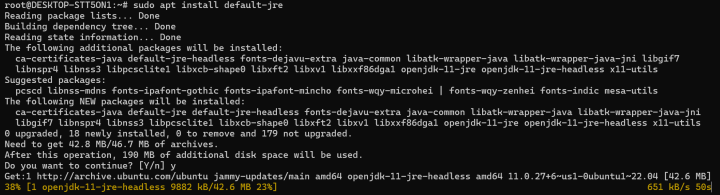
To install the default Java Runtime Environment:
$ sudo apt install default-jreThis will enable you to run Java applications on your system.
Step 4: Confirm JRE Installation
After installation, verify it with:
$ java -version
Step 5: Install the JDK (If Required)
If you plan to develop Java applications, you’ll also need the JDK. Install it using:
$ sudo apt install default-jdk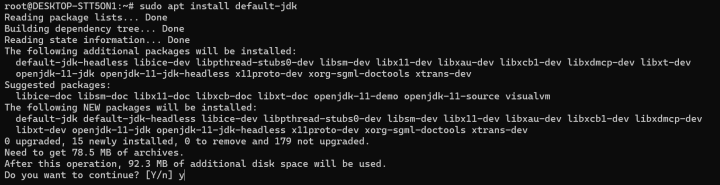
Step 6: Verify JDK Installation
Check if the Java compiler is installed:
javac -version
Next, you can explore how to install the official Oracle JDK if you require it for specific applications or licensing reasons.
Method 02: Installing Oracle JDK 11 on Ubuntu
Unlike OpenJDK, Oracle’s official JDK cannot be automatically installed via Ubuntu’s default package managers due to licensing restrictions. To set it up, you’ll need to manually download the JDK from Oracle’s website and use a helper installation script provided by a third-party repository.
Oracle JDK includes the JRE, so a separate runtime installation is not required.
Step 1: Identify the Required JDK Version
First, determine which version of Oracle JDK the installer script supports. Visit the oracle-java11-installer page and locate the version number listed for your Ubuntu release (such as Jammy). For example, if the script supports version 11.0.13, make sure to download that exact version from Oracle’s archive.
Step 2: Download Oracle JDK Archive
- Go to the Oracle Java Archive Downloads.
- Find the Java SE 11 section.
- Select the .tar.gz archive file for Linux x64 (e.g., jdk-11.0.13_linux-x64_bin.tar.gz).
- Accept the license agreement and begin the download. You may need to log in with your Oracle account.
Step 3: Transfer the Archive to Your Server
Once downloaded to your local machine, transfer the file to your Ubuntu server using the scp command:
$ scp ~/Downloads/jdk-11.0.13_linux-x64_bin.tar.gz Step 4: Add the Installation Repository and Key
Import the GPG key for the third-party installer repository:
$ sudo gpg --homedir /tmp --no-default-keyring --keyring /usr/share/keyrings/oracle-jdk11-installer.gpg --keyserver keyserver.ubuntu.com --recv-keys EA8CACC073C3DB2AYou’ll see confirmation that the key has been imported successfully.
Next, add the repository to your system:
echo "deb [arch=amd64 signed-by=/usr/share/keyrings/oracle-jdk11-installer.gpg] https://ppa.launchpadcontent.net/linuxuprising/java/ubuntu jammy main" | sudo tee /etc/apt/sources.list.d/oracle-jdk11-installer.list > /dev/nullThen update your package list:
$ sudo apt updateStep 5: Prepare the Installer Cache
Create the local cache directory and move the downloaded Oracle JDK archive into it:
$ sudo mkdir -p /var/cache/oracle-jdk11-installer-local/

$ sudo cp jdk-11.0.13_linux-x64_bin.tar.gz /var/cache/oracle-jdk11-installer-local/
Step 6: Install Oracle JDK 11
Run the installation command:
$ sudo apt install oracle-java11-installer-localDuring installation, you'll be prompted to accept Oracle’s license terms. After accepting, the script will extract and install the JDK.
Once the installation completes, you can proceed to configure and select the Java version to use as the default on your system.
Managing Multiple Java Versions on Ubuntu
You can install and manage multiple Java versions on the same system. To set the default Java version for command-line use, run:
$ sudo update-alternatives --config javaThis command will display a list of installed Java versions. Enter the number corresponding to the version you want to set as default, or press ENTER to keep the current one.
You can repeat this process for other Java tools like the compiler (javac), documentation generator (javadoc), or keystore tool (keytool) using:
$ sudo update-alternatives --config javacSetting the JAVA_HOME Environment Variable on Ubuntu
Many Java applications rely on the JAVA_HOME variable to locate the Java installation directory.
Step 1: Find the Java Installation Path
Use the following command to list all installed Java versions and their paths:
$ sudo update-alternatives --config javaNote the path of the version you want to set, but remove the /bin/java part. For example:
- OpenJDK 11: /usr/lib/jvm/java-11-openjdk-amd64
- Oracle JDK 11: /usr/lib/jvm/java-11-oracle
Step 2: Set JAVA_HOME Globally
Edit the system-wide environment file:
$ sudo nano /etc/environmentAdd this line at the end of the file (replace with your chosen Java path):
JAVA_HOME="/usr/lib/jvm/java-11-openjdk-amd64"Save and close the file.
Step 3: Apply the Changes
To apply the updated environment variable immediately:
source /etc/environmentCheck if it's set correctly:
echo $JAVA_HOMEYou should see the path you configured. Other users need to either run the same source command or log out and back in to activate the changes.
Conclusion
In this guide, you learned how to install Java on Ubuntu using multiple approaches, including both OpenJDK and Oracle JDK. It also covered how to switch between installed versions, set the JAVA_HOME environment variable, and remove Java if needed.
Experience blazing-fast performance with 10GBVPS, designed to boost your website's speed and responsiveness. Say goodbye to bandwidth restrictions and unexpected overage charges—our plans offer generous limits to keep your site running smoothly. With server locations worldwide, you can select the one that best suits your audience for optimal reliability and speed. Power your online presence with the performance and flexibility your business deserves.
Blog